队列是一种特殊的线性表,特殊之处在于它只允许在表的前端(front)进行删除操作,而在表的后端(rear)进行插入操作,和栈一样,队列是一种操作受限制的线性表。进行插入操作的端称为队尾,进行删除操作的端称为队头。
队列的特点
- 遵循先进先出的原则,与栈相反,栈遵循先进后出的原则
- 队列中通常存在两个指针front和rear,分别称为队头、队尾。数据通常是从队尾入队(插入操作),从队头出队(删除操作)。
- 队列可以通过链表、数组进行实现
- 队列又被称为先进先出线性表(FIFO—first in first out)
相关知识点
- 下溢现象:当队列为空时,做出队运算产生的溢出现象。
- 上溢现象:当队列已满时,做入队运算产生的溢出现象
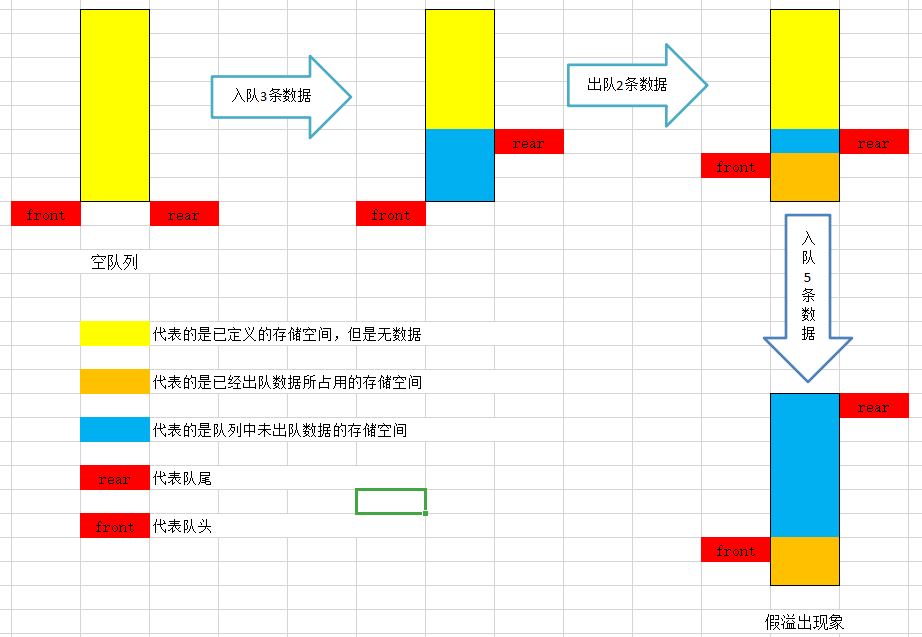
- 假上溢现象:当使用数组进行实现队列时,因为数组的长度为定值,如果不能重复利用已经出队的数据空间,使得队列头、队列尾不断的增加,最后导致虽然队列中的可用数据量未达到队列的最大容量,但是也不能进行入队操作,该现象称为“假上溢”,在实际实现的过程中应该设法避免
顺序队列
我们都知道在JAVA/C/C++中数组是一种顺序线性表,那么,顺序队列其实就是使用数组进行模拟队列。
在顺序队列中,一般存在两个指针,一个是队头指针front,它指向队头元素;另一个是队尾指针rear,它指向下一个入队元素的存储位置。每次在队尾插入一个元素是,rear增1;每次在队头删除一个元素时,front增1。随着插入和删除操作的进行,队列元素的个数不断变化,队列所占的存储空间也在为队列结构所分配的连续空间中移动。当front=rear时,队列中没有任何元素,称为空队列。当rear增加到指向分配的连续空间之外时,队列无法再插入新元素,但这时往往还有大量可用空间未被占用(假上溢现象),这些空间是已经出队的队列元素曾经占用过得存储单元。

代码实现
1
2
3
4
5
6
7
8
9
10
11
12
13
14
15
16
17
18
19
20
21
22
23
24
25
26
27
28
29
30
31
32
33
34
35
36
37
38
39
40
41
42
43
44
45
46
47
48
49
50
51
52
53
54
55
56
57
58
59
60
61
62
63
64
65
66
67
68
69
70
71
72
73
74
75
76
77
78
79
80
81
82
83
84
85
86
87
88
89
90
91
92
93
94
| package ArrayQueue;
public class ArrayQueue {
private int front = -1;
private int rear = -1;
private int maxSize;
private int[] data;
public ArrayQueue(int maxSize) {
this.maxSize = maxSize;
this.data = new int[maxSize];
}
public boolean isEmpty() {
return this.rear == this.front;
}
public boolean isFull() {
return this.rear == (this.maxSize - 1);
}
public boolean inQueue(int data) {
if (this.isFull()) {
return false;
}
this.data[++this.rear] = data;
return true;
}
public int outQueue() {
if (this.isEmpty()) {
throw new RuntimeException("队列为空,出队失败");
}
return this.data[++this.front];
}
public void peek() {
if (this.isEmpty()) {
return;
}
System.out.printf("下一个即将出队的数据为:%d \n", this.data[this.front + 1]);
}
public void print() {
if (this.isEmpty()) {
return;
}
System.out.println("下面是队列中的所有数据");
for (int i = this.front + 1; i <= this.rear; i++) {
System.out.printf("%d \t", this.data[i]);
}
System.out.println();
}
}
|
1
2
3
4
5
6
7
8
9
10
11
12
13
14
15
16
17
18
19
20
21
22
23
24
25
26
| package ArrayQueue;
public class Main {
public static void main(String[] args) {
ArrayQueue arrayQueue = new ArrayQueue(10);
arrayQueue.inQueue(10);
arrayQueue.inQueue(20);
arrayQueue.inQueue(30);
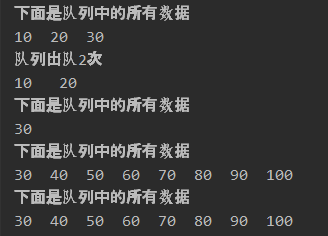
arrayQueue.print();
System.out.println("队列出队2次");
System.out.printf("%d \t %d \n", arrayQueue.outQueue(), arrayQueue.outQueue());
arrayQueue.print();
arrayQueue.inQueue(40);
arrayQueue.inQueue(50);
arrayQueue.inQueue(60);
arrayQueue.inQueue(70);
arrayQueue.inQueue(80);
arrayQueue.inQueue(90);
arrayQueue.inQueue(100);
arrayQueue.print();
arrayQueue.inQueue(110);
arrayQueue.print();
}
}
|
循环队列
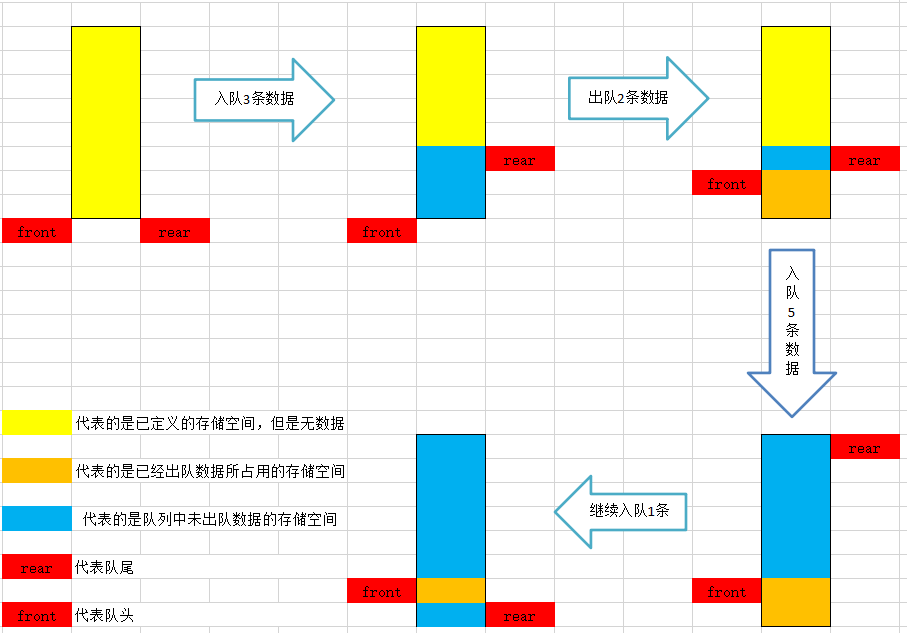
在实际使用队列时,为了使队列空间能重复使用(解决假溢出现象),往往对队列的使用方法稍加改进:无论插入或删除,一旦rear指针增1或front指针增1 时超出了所分配的队列空间,就让它指向这片连续空间的起始位置。自己真从MaxSize-1增1变到0,可用取余运算rear%MaxSize和front%MaxSize来实现。这实际上是把队列空间想象成一个环形空间,环形空间中的存储单元循环使用,用这种方法管理的队列也就称为循环队列。值得注意的是,如果使用循环队列,则rear==front将不作为判断是否为空的标志,因为队列是一个环状结构,所以我们需要引入一个变量来确认队列中的数据数量。
代码实现
1
2
3
4
5
6
7
8
9
10
11
12
13
14
15
16
17
18
19
20
21
22
23
24
25
26
27
28
29
30
31
32
33
34
35
36
37
38
39
40
41
42
43
44
45
46
47
48
49
50
51
52
53
54
55
56
57
58
59
60
61
62
63
64
65
66
67
68
69
70
71
72
73
74
75
76
77
78
79
80
81
82
83
84
85
86
87
88
89
90
91
92
93
94
95
96
97
98
99
100
101
102
103
104
105
106
| package ArrayQueue;
public class CircularArrayQueue {
private int front = -1;
private int rear = -1;
private int maxSize;
private int[] data;
private int count = 0;
public CircularArrayQueue(int maxSize) {
this.maxSize = maxSize;
this.data = new int[maxSize];
}
public boolean isEmpty() {
return 0 == this.count;
}
public boolean isFull() {
return this.count == this.maxSize;
}
public boolean inQueue(int data) {
if (this.isFull()) {
return false;
}
int index = (this.rear + 1) % this.maxSize;
this.data[index] = data;
this.rear = index;
this.count++;
return true;
}
public int outQueue() {
if (this.isEmpty()) {
throw new RuntimeException("队列为空,出队失败");
}
int index = (this.front + 1) % this.maxSize;
int value = this.data[index];
this.front = index;
this.count--;
return value;
}
public void peek() {
if (this.isEmpty()) {
return;
}
int index = (this.front + 1) % this.maxSize;
System.out.printf("下一个即将出队的数据为:%d \n", this.data[index]);
}
public void print() {
if (this.isEmpty()) {
return;
}
System.out.println("下面是队列中的所有数据");
int index;
for (int i = 1; i <= this.count; i++) {
index = (this.front + i) % this.maxSize;
System.out.printf("%d \t", this.data[index]);
}
System.out.println();
}
}
|
1
2
3
4
5
6
7
8
9
10
11
12
13
14
15
16
17
18
19
20
21
22
23
24
25
26
27
28
| package ArrayQueue;
public class Main {
public static void main(String[] args) {
CircularArrayQueue arrayQueue = new CircularArrayQueue(10);
arrayQueue.inQueue(10);
arrayQueue.inQueue(20);
arrayQueue.inQueue(30);
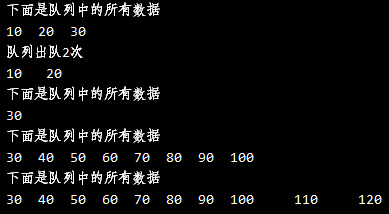
arrayQueue.print();
System.out.println("队列出队2次");
System.out.printf("%d \t %d \n", arrayQueue.outQueue(), arrayQueue.outQueue());
arrayQueue.print();
arrayQueue.inQueue(40);
arrayQueue.inQueue(50);
arrayQueue.inQueue(60);
arrayQueue.inQueue(70);
arrayQueue.inQueue(80);
arrayQueue.inQueue(90);
arrayQueue.inQueue(100);
arrayQueue.print();
arrayQueue.inQueue(110);
arrayQueue.inQueue(120);
arrayQueue.inQueue(130);
arrayQueue.print();
}
}
|